 Home
Home Up
Up Search
 Mail
Mail
NEW
Using the Calanais I
3D scenery in Stellarium: some experiences when ground proofing.
The following subjects are handled on this page:
Introduction
A 3D scenery has been
made of Calanais I
which can be examined in Stellarium. As with all things,
developments will be made and this web page will look into some of
these in due time.
The present model (V1.0,
2Feb2023) does not include the nearby (50m) outcrop Cnoc an
Turso, so the incoporated Stellarium landscape (Callanish
I) can only be
used around the North end of the avenue for a correct skyline
view. On this webpage we will investigate the inclusion of this
outcrop as a DSM model: aka ground proofing. Furthermore the
alignment of the terrrain including site, skyline and skyscape
will be reperformed. This will also provide an idea on
accuracy/precision.
The DSM of Cnoc an Turso was aquired from bluesky and they provided permission
to add it in the public domain Calanais I 3D scenery.
When the testing phase has passed, it is recommended to be
incorporated on the main web site.
Some definitions
Reappearing object: When the
celestial object (such as Moon) becomes again visible from behind
skyline features
Regleaming object: When the
celestial object (such as Moon) becomes again visible from behind a
sites stone
Remarks:
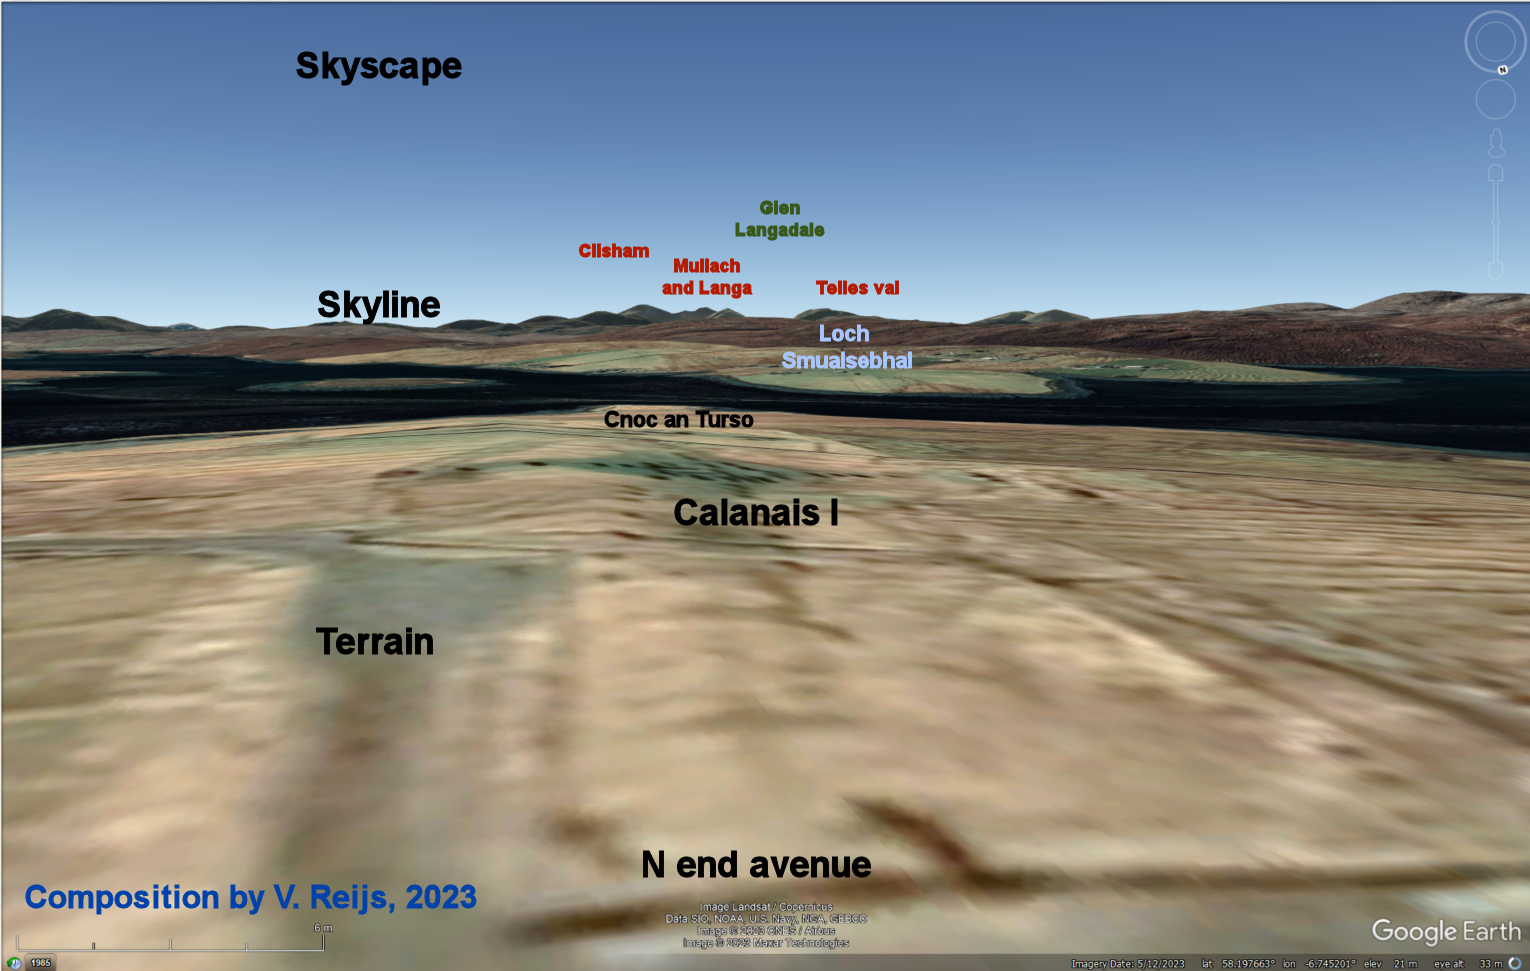
3D scenery components
Terrain
The terrain consists of two parts, which are included in
Stellarium:
- Calanais I:
3D laser scan
This 3D laser scan has been produced as a cooperation between Archaeoptics and
Callanish Blackhouse. Furthermore it has been
incorporated in Stellarium by a team of volunteers.
This 3D laser scan provides an accurate molel of the Calanais
stones (as a standalone site)
- Cnoc an Turso: Photographic
Digital Surface Model (DSM)
A DSM (resolution 25cm) has been acquired from bluesky (accuracy XY: ± up to
1m RMSE; accuracy Z: ± up to 1.5m RMSE). Reijs has acquired this
DMS with copyright permissions (similar to the 3D scenery in
Stellarium: CC BY-NC-SA 4.0),
from bluesky.
This photographic DSM had two important functions: a) it
provides a relatively higth resolution (25cm) model to a outcrop
some 50m from Calanais I (a model of this outcrop is essential, as it
determines part of the [southern] skyline); and b) this DSM was
utliised to georeference the 3D laser scan.
Contours Calanais I stones
Numbering (Ponting&Ponting, 1981, p 80) of the Calanais I stones is here:
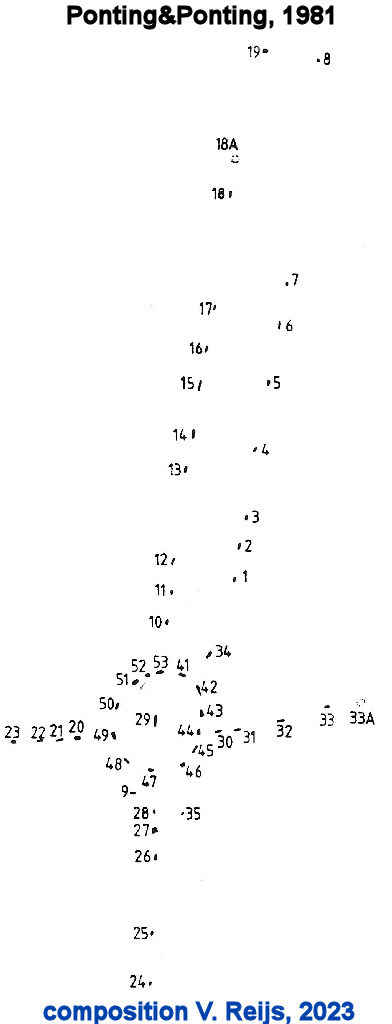
Numbering of the Calanais I stones from Ponting&Ponting
|
See the uncertainty symbol for 18A and 33A. 33A was reerected in
1982, so after the publication of above numbering picture (Curtis,
2011, p. 3)
Calanais I
contour by Ponting&Ponting (1981, page 100), seen from midway
Stone 8 and 19

Calanais I contour by Curtis&Curtis (1994,
page 30), seen with back to Stone 8
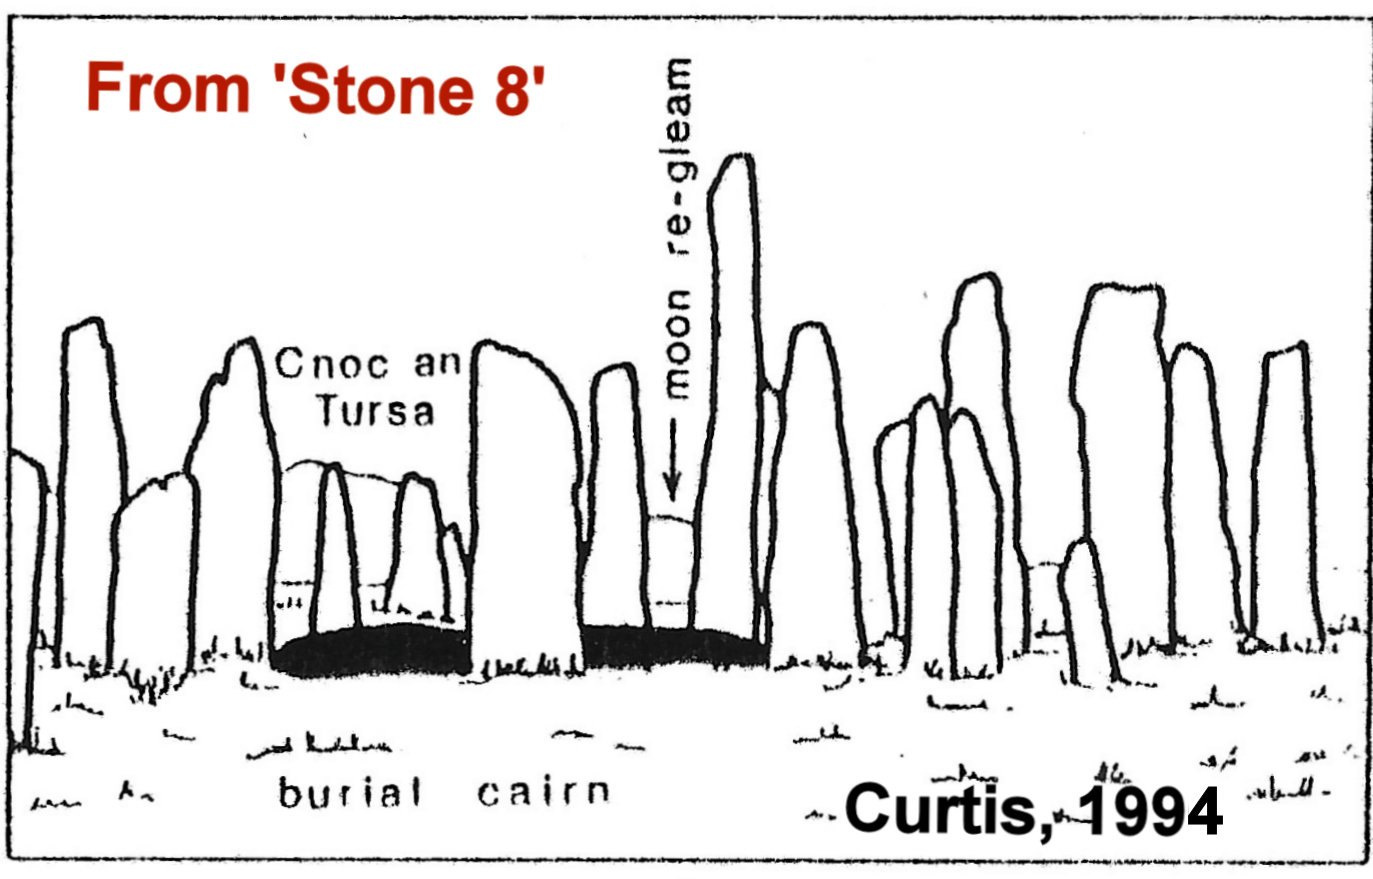
Skyline
All the below skylines do not include the nearby (50m) outcrop
Cnoc an Turso. Cnoc an Turso makes the skyline variable when
walking through Calanais I. When one wants to have a proper skyline, this outcrop
needs to be included in the 3D scenery.
Thom (1971, pp 69)
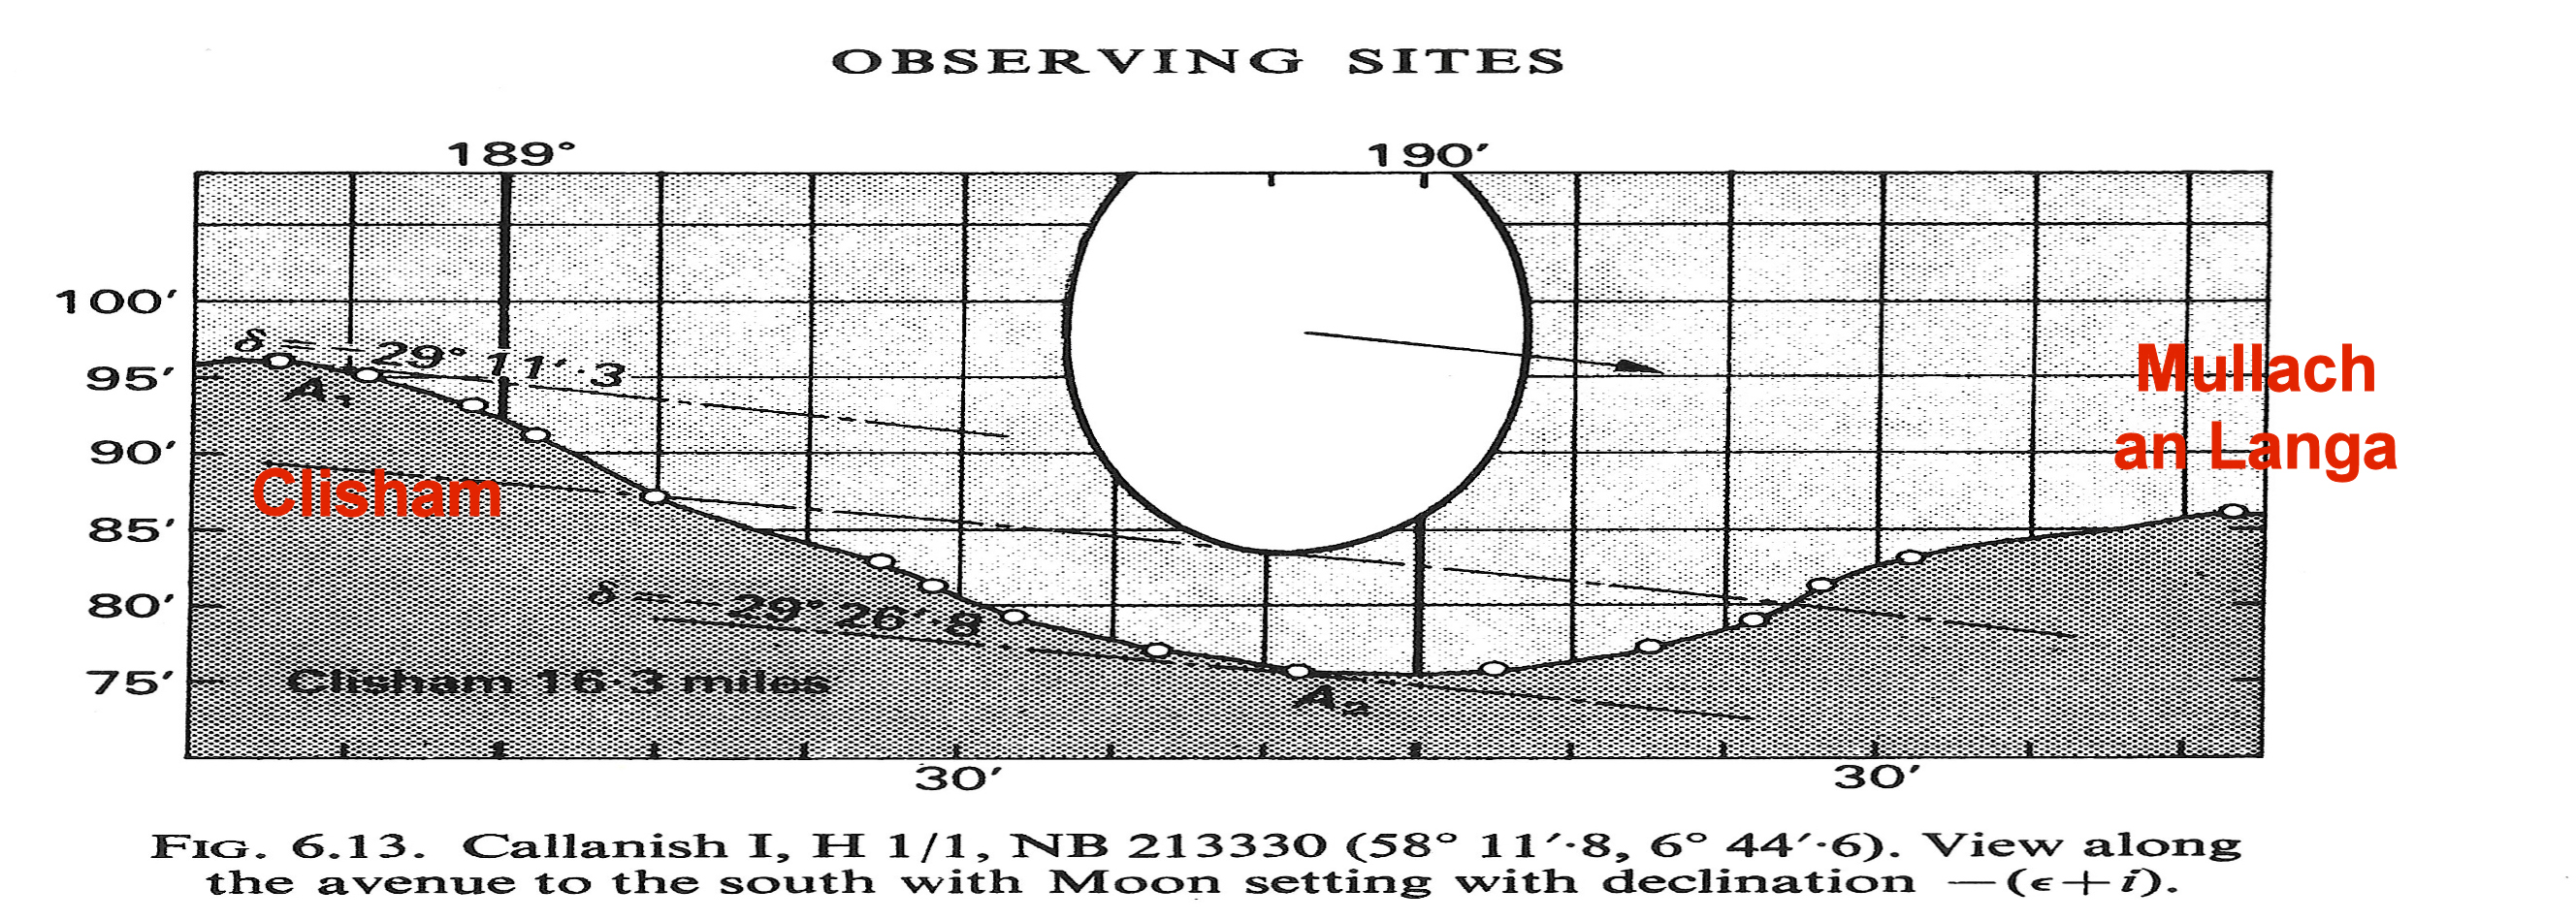
This skyline was calculated from OS map by Thom. It looks that the
declination numbers are referring to the geocentric declination
(more logical would be a topocentric declination, as a Earth
reference is wanted).
Curtis&Curtis (1994, pp 31)

Horizon (Smith, 2022)
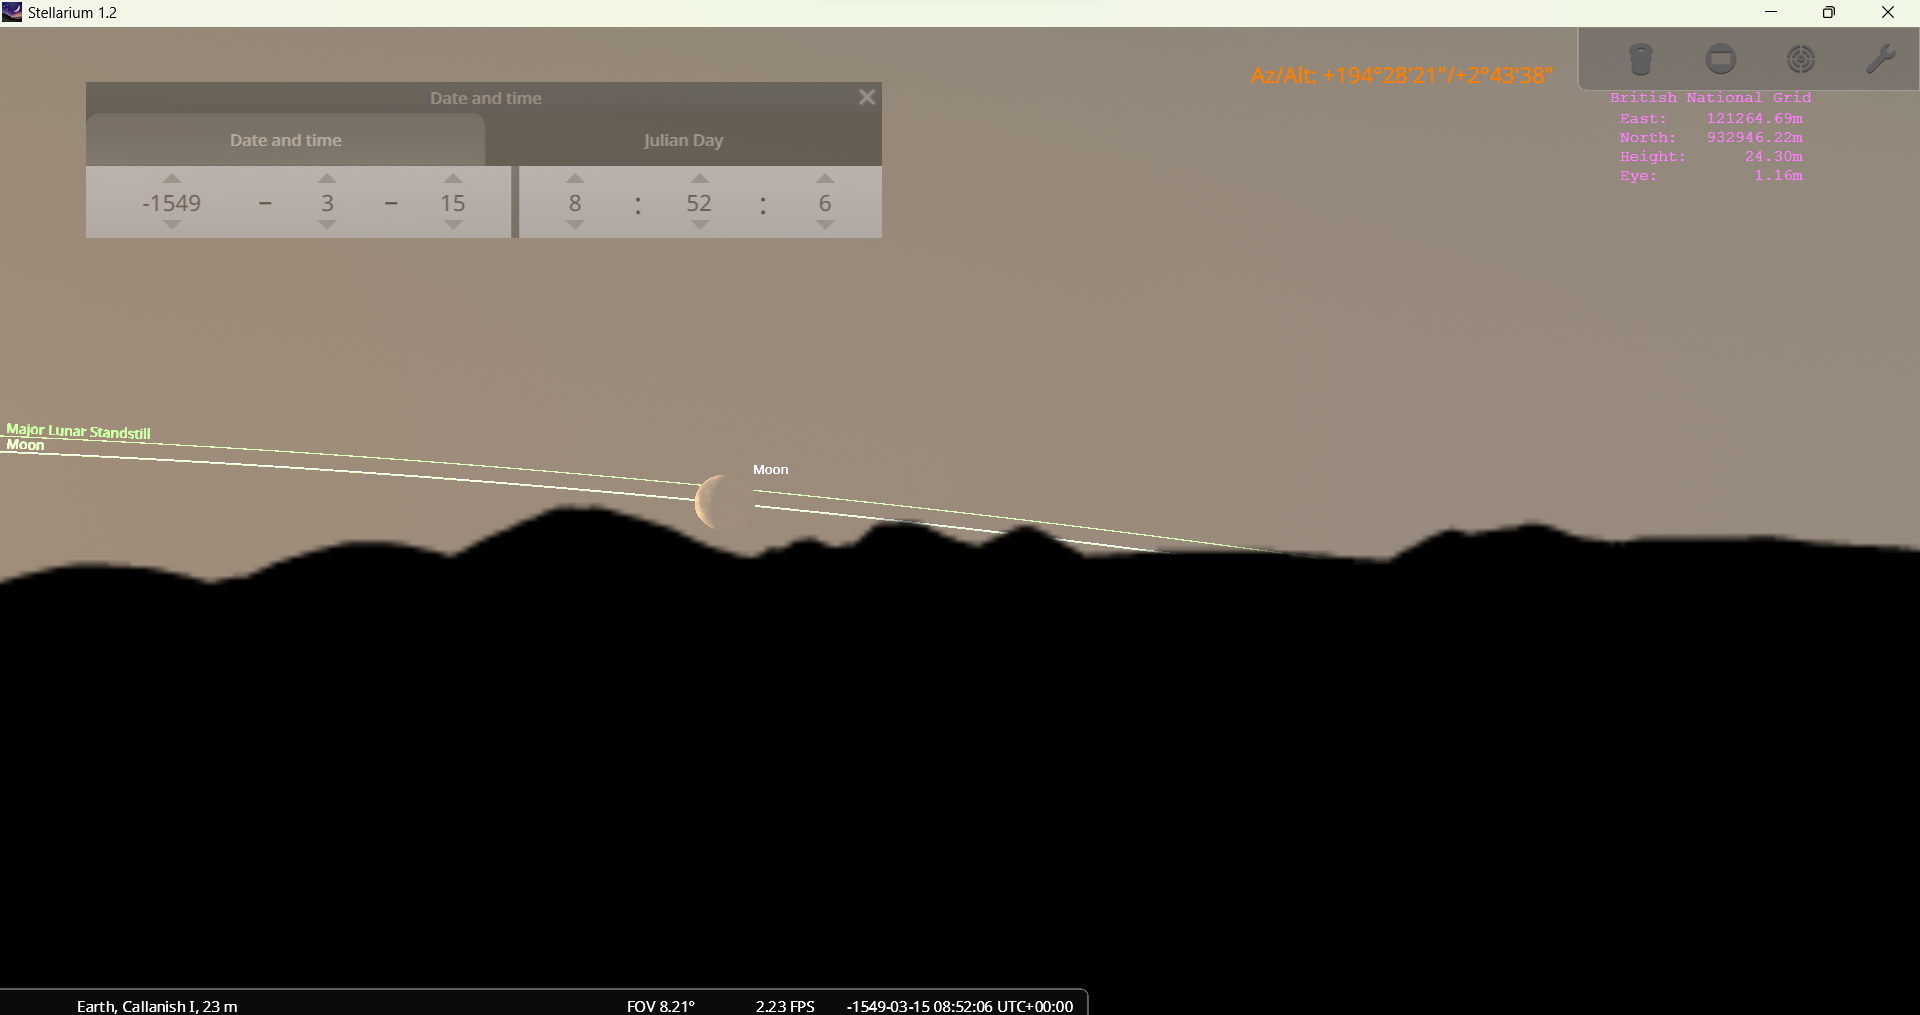
Both Horizon (using SRTM 1") and HeyWhatsThat (using
SRTM 3") are not able to represent the nearby (50m) Cnoc an Turso.
That is a hidden advantage in this case; as the skyline would not
be correct if such nearby feature would be included in a skyline
(of for instance Stellarium) for many standpoints.
My
experience with HeyWhatsThat and SyntH (debugging plus
comparing with several other methods) is good. Horizon also
maps HeyWhatsThat's skylines, so both tools give similar results (for skylines further
away than 5km) and can be trusted (but keep knowing their
limitations).
Skyscape
The skyscape is simulated using Stellarium.
Aligning the 3D scenery
Nearby terrain alignment
Ponting&Ponting
Standing midway Stone 8 and 19 an animated gif: Combination of
Ponting (red contours) plus 3D laser scan (gray-ish) & DSM
(green: Cnoc an Turso) and Rennie's photograph (green-ish):
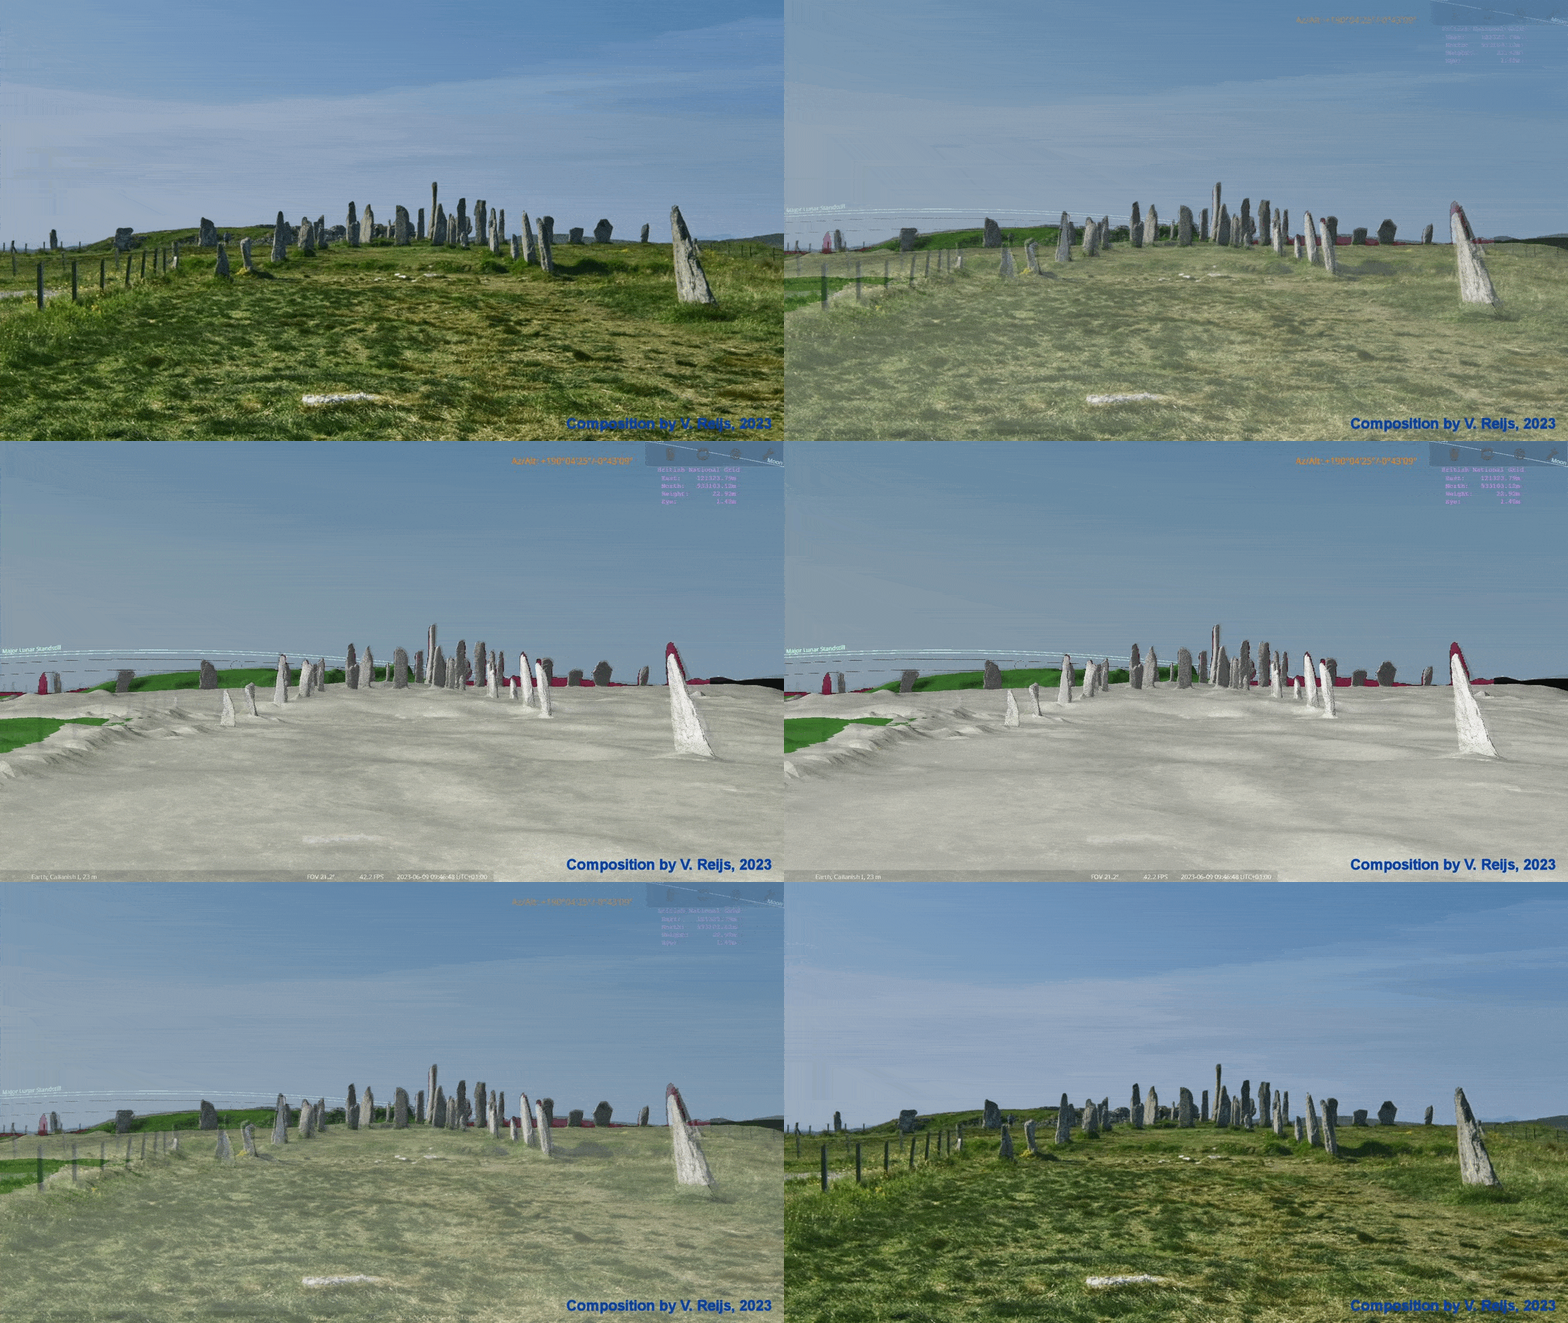
The contour of Cnoc and Turso DSM (green) looks similar to the
photograph (green-ish). Stone 33A is tough different in Ponting
(1981), as it was only positioned correctly in 1982,
Curtis&Curtis
Standing with back to Stone 8 an animated gif: Combination of 3D
laser scan (gray-ish) & DSM (green: Cnoc an Turso) and
Rennie's photograph (blue-ish):
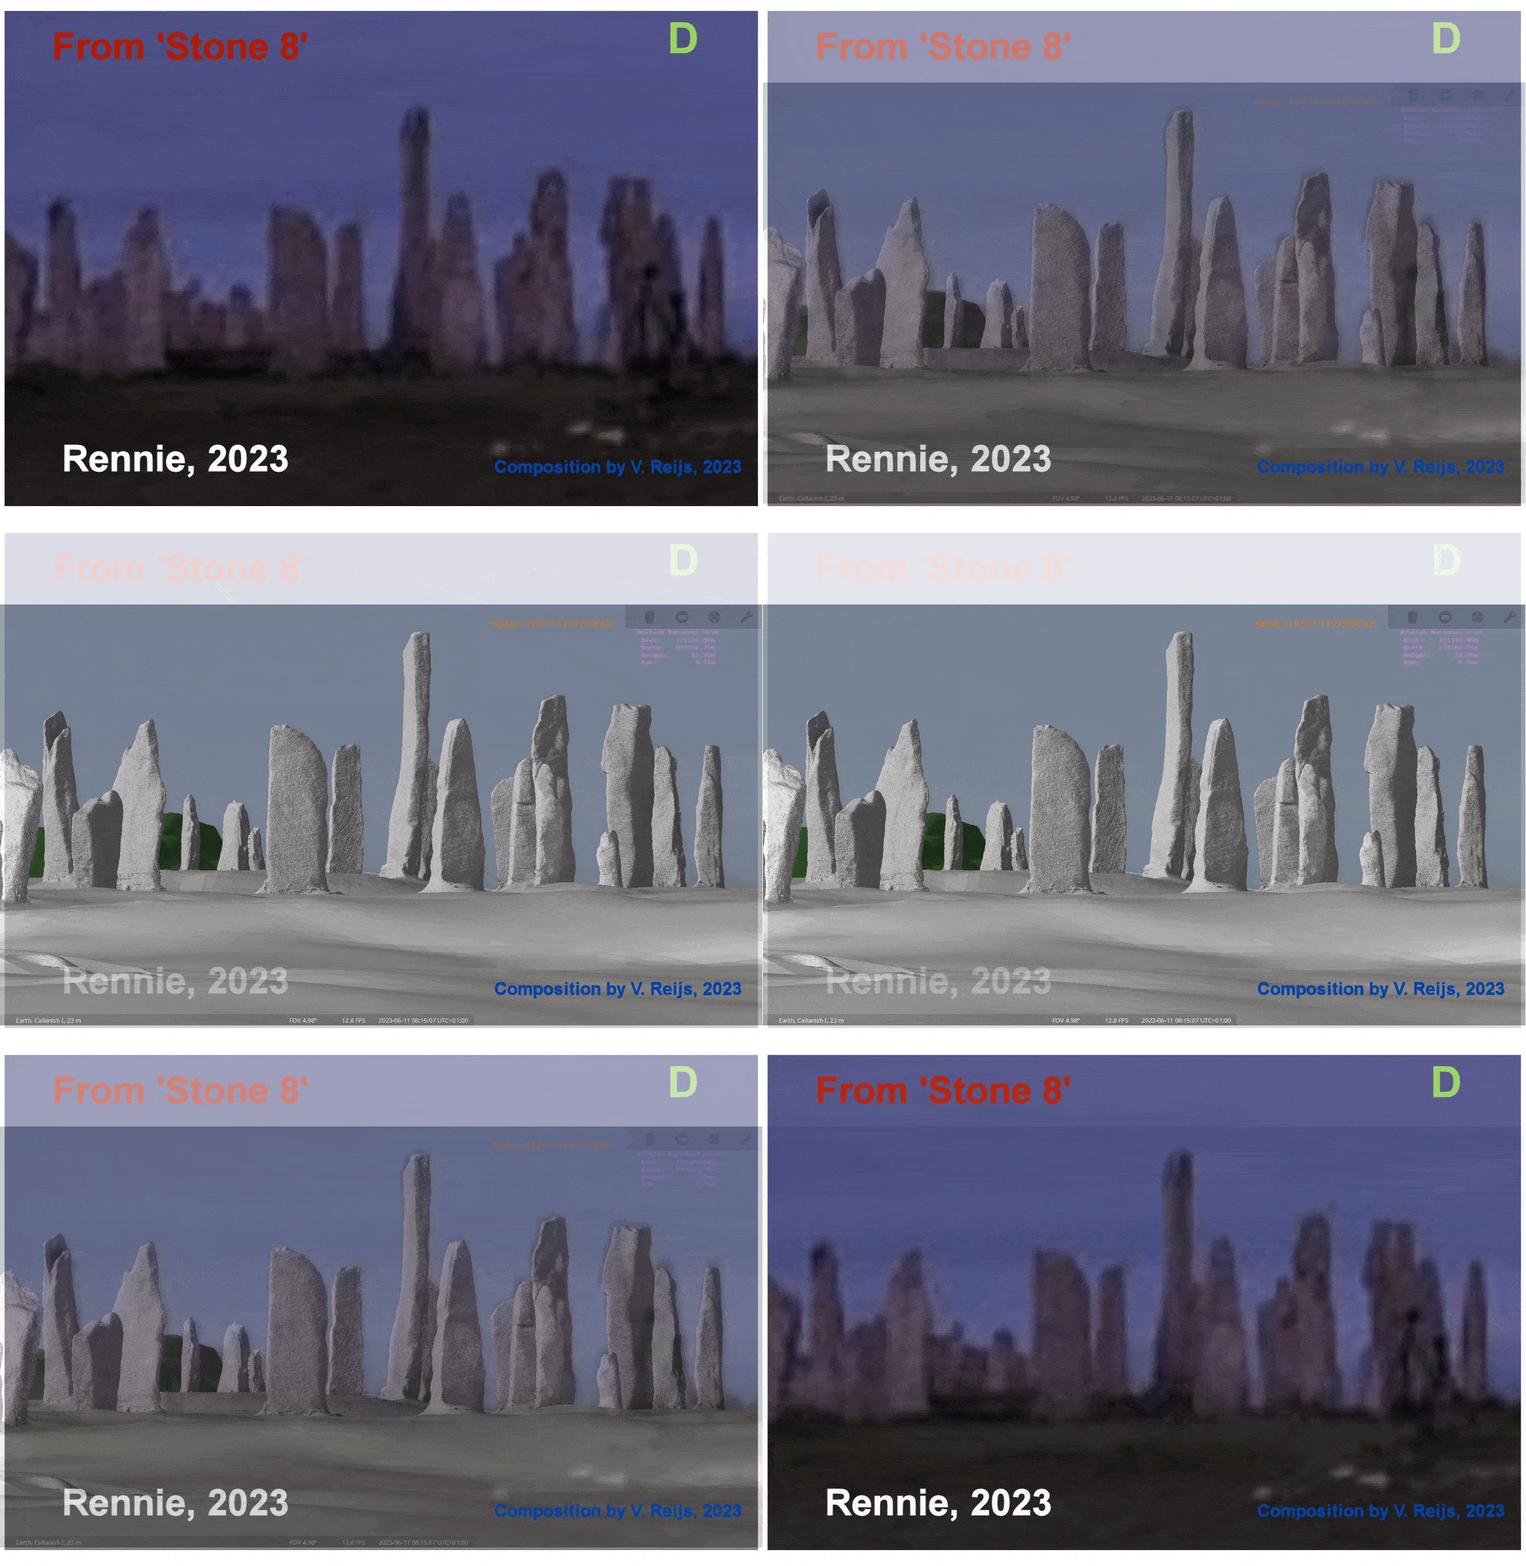
The contour of Cnoc and Turso DSM (green) is slightly different
(not as far extending towards the right) than the photograph
(blue-ish).
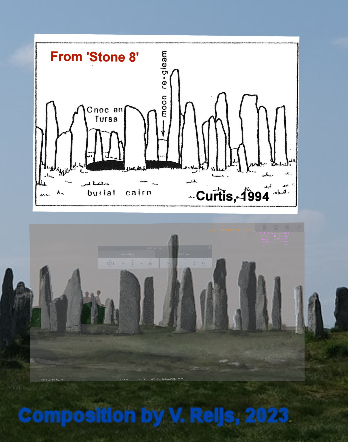
The amount of gaps between stones
seen in Curtis&Curtis (1994) is similar to seen in the
Stellarium 3D scenery (grey-ish) and photo (background; Rennie,
2023):
Contour alignment
Ponting&Ponting
Mapping Ponting&Ponting (1981, page 100) skyline on
photograph (Rennie, 2023):
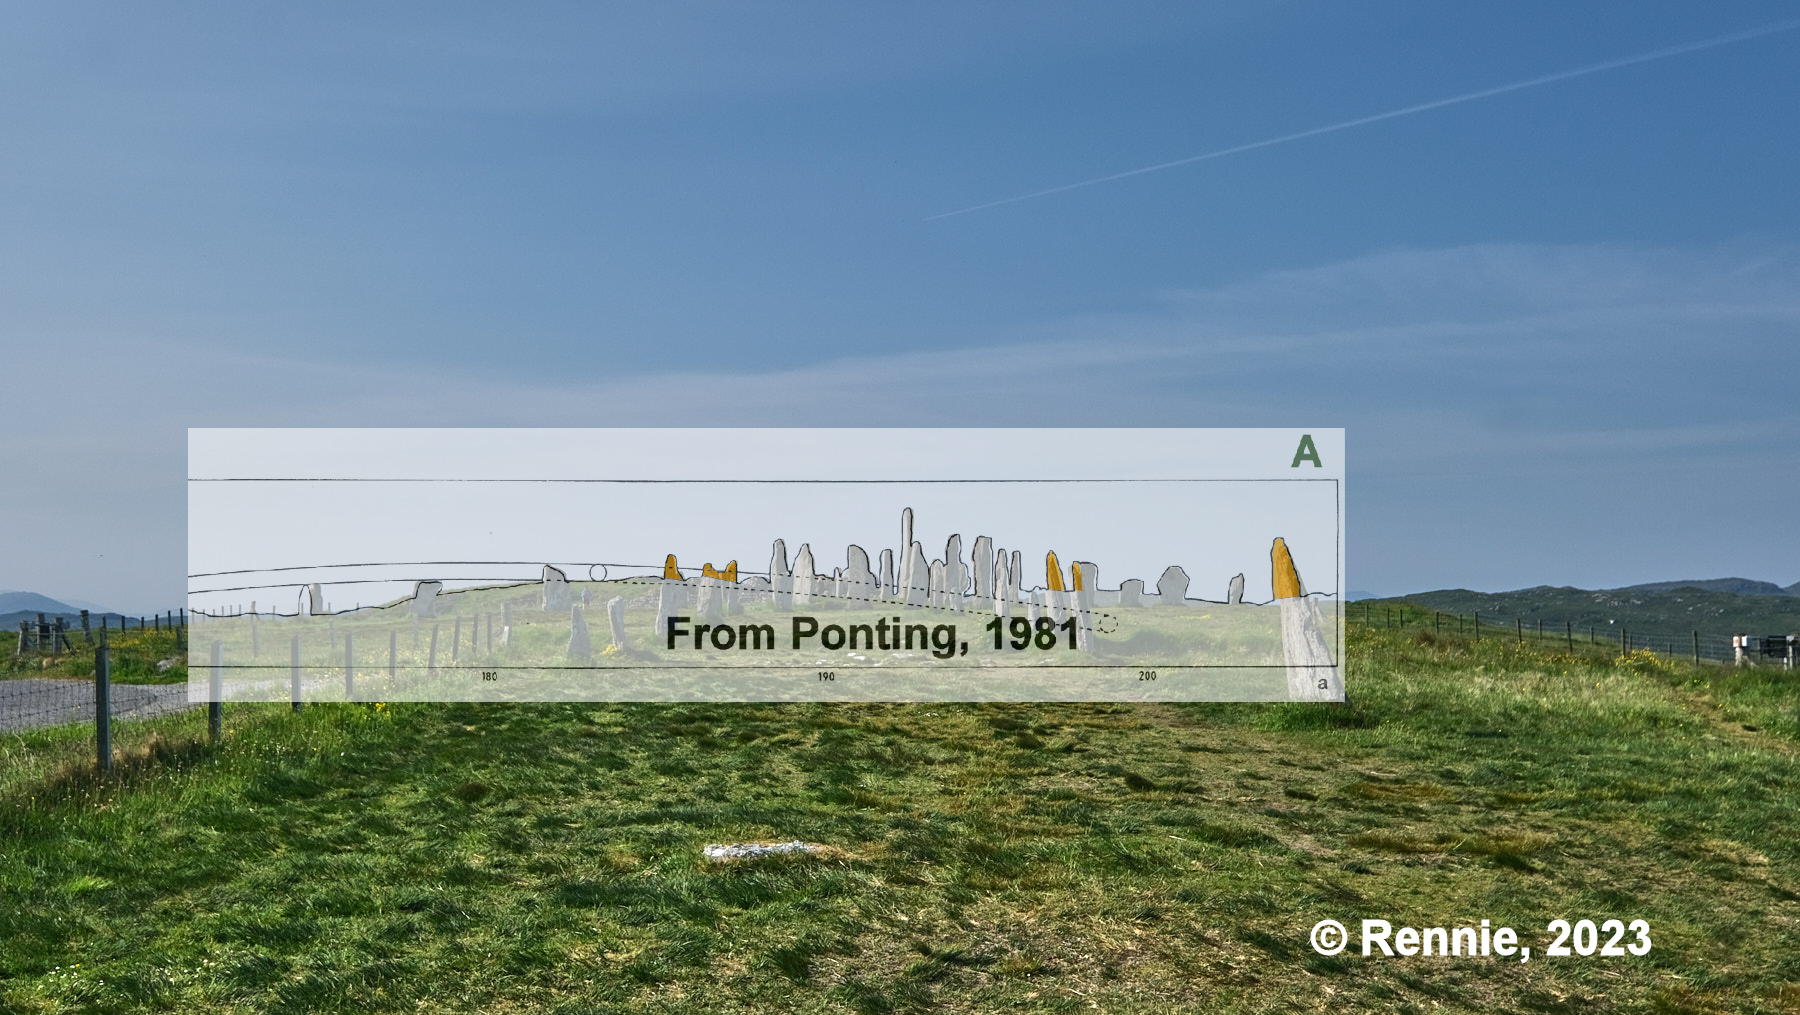
Ponting&Ponting's skyline is made from midway between Stone 8
and 19.
Curtis&Curtis
Mapping Curtis&Curtis (1994, page 30) skyline on photograph
(Rennie, 2023):
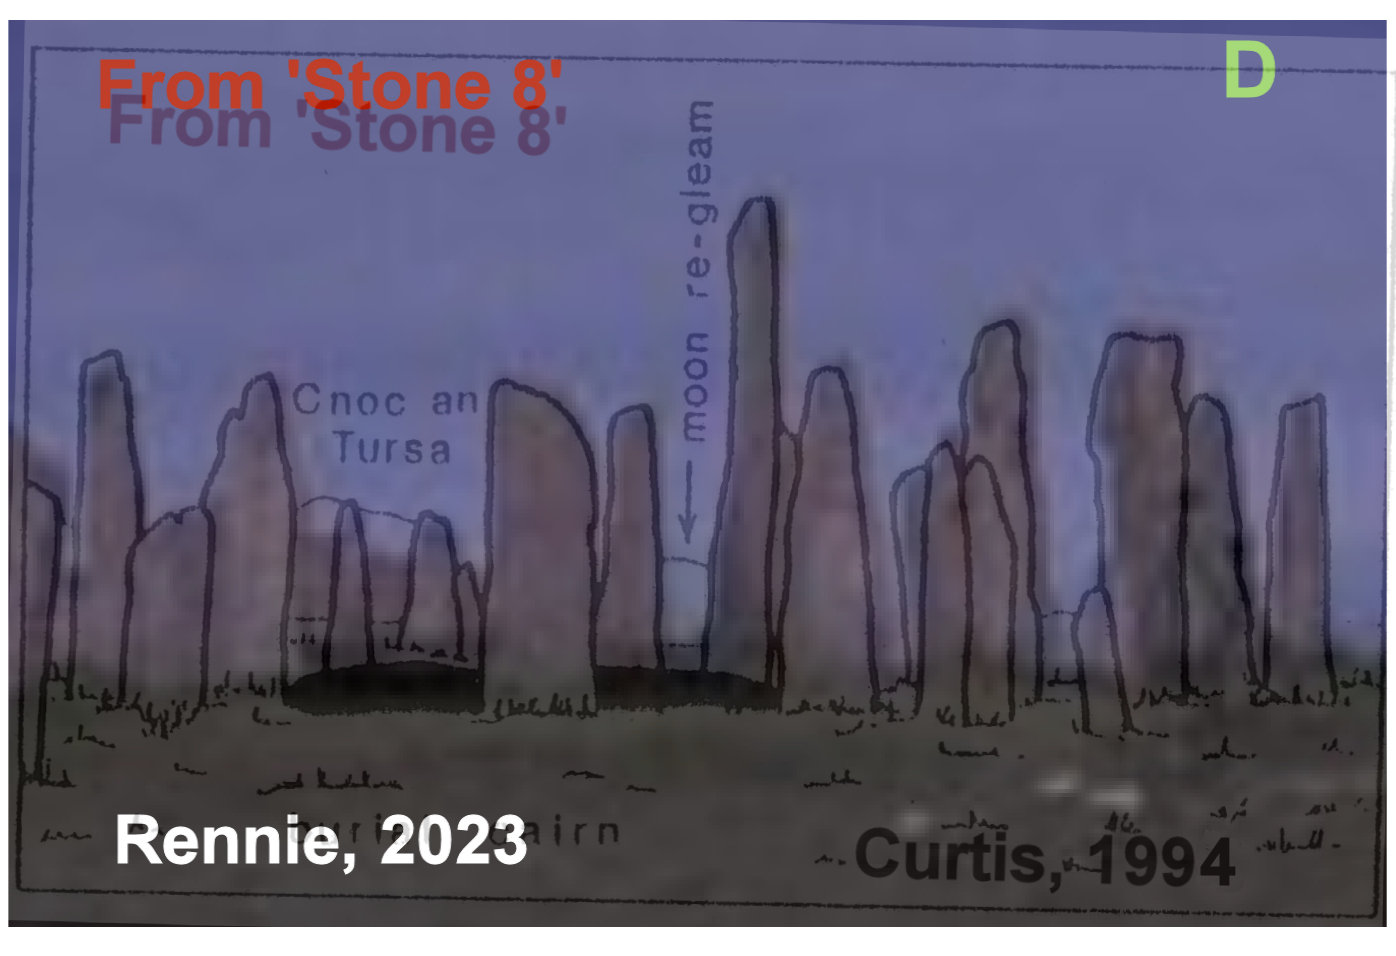
Curtis&Curtis' skyline is made with one's back to Stone 8.
Skyline alignment
Here we want to verify if the 3D scenery is properly aligned with
the skyline (aka Stellarium landscape). This can be done
by photographs that include contours of site and skyline.
Below is an animated gif from view in Stellarium (using Horizon
for the skyline [black]) and a photo ([green-ish]; from
Rennie, 2023):

Looking at the skylines: the skyline ([black] Horizon as
Stellarium's landscape) and a photo [green-ish] of these
features: not much difference can be inferred. There could be some
inaccuracy of the skyline-software and some small lens
distortions.
Skyscape alignment
These aligments, by using the Moon, are to verify the azimuth and
apparent altitude of the contours of Calanais I (ground proofing),
as seen from Stone 8.
Observations of the Moon have been done on days that the Moon
touches at least a few stones (NM = New Moon): May 2023 9th,
10th; June 5th, 6th, 7th; July 2nd,
3rd, 4th; July 28th, 29th,
31st; August
25th, 26th, 27th; September 21st,
22nd, 23rd, 24th; October 19th,
20th, 21nd; November 15th, 16th,
17th; December 12th (NM), 13th, 14th,
2023; January 9th, 10th, 11th (NM);
February 5th, 6th, 7th; February 21st
(using Moon as proxy to summer solstice); March 4th, 5th
(top 10;
migth have been a visible Moon, but not present), 6th ;
March 31st,
April 1st (top 6), 2nd; April 27th,
28th, 29th,
30th; May 24th, 25th, 26th,
27th; June 21th, 22th, 23th, 24th;
July 19th, 20th; Aug 14th, 15th
(top 4),
16th; Sept 10th, 11th, 12th (top 7), 13th;
Oct 7th; 8th, 9th (top
2), 10th; Nov 4th, 5th (top 5), 6th;
Dec 1st (NM), 2nd, 3rd, 4th;
Dec 28th, 29th, 30th, 31th;
2024.
Interesting to observe is that for the day period when the Moon will
be touching a few stones; the end day-number of that period is
(sometimes) more or less the start day-number of the earlier event
period. This is though something that has IMHO no intent when the
epoch the stones were built (as in that epoch day numbers were very
possibly not in use).
It can be somewhat explained: the cycle of major events is 27.3
days, the Moon is some 3 to 4 days through the stones, so indeed the
end of a period has more or less the same day-number as the start of
the earlier period.
If the Moon is visible, is of course depending on the weather and the age of the Moon: happened until now
(from May 2023 to December 2024) only on 8 of 71 dates (~11%).
By the way the amount of cloudfree-ish days experienced at relevant
moments on the backwall of Maeshowe was around 25% (over
period December 1997 until December 2001).
The next
oppertunities are here.
Photo taken on July 6th, 2023
Only one photo provide the Moon near a stone (the rest: clouds).
Below is the photo taken by Rennie (with back to Stone 8) on July 6th,
2023 at 03:22:57BST. It also inlcudes the Moon as depicted in
Stellarium:
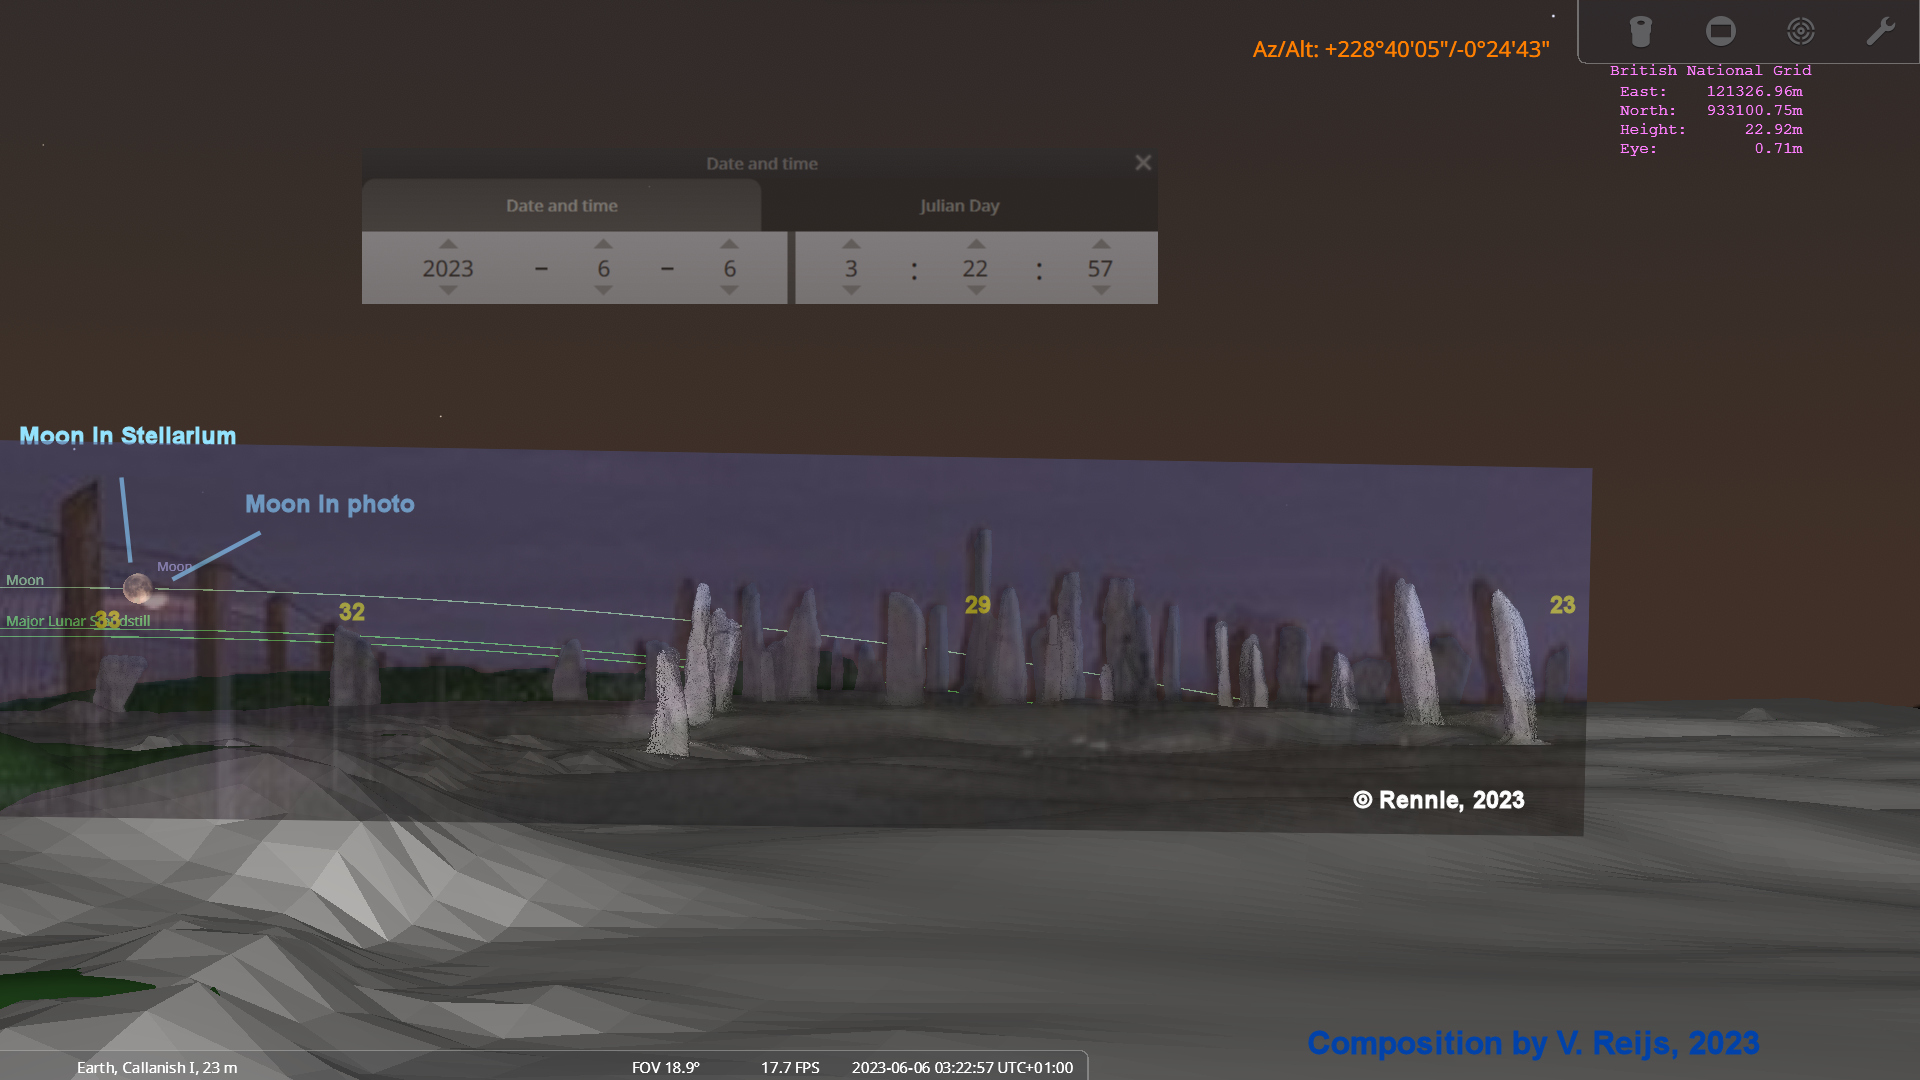
Stone 33 and 23 are aligned in both the photo and the Stellarium
screen grab. As one can see; the Moon is not in the same position
for the two depictions (looks to be a time difference of some 1.5
minutes or azimuth difference of 20arcmin). The timing might not be
correct. As a result: A
workflow looking at synchronising camera and time has been
deployed.
Photos taken on July 31st,
2023
Some 23 relevant photos were take of the Moon in relation to a
stone. The evaluation of these photos is here.
Photos taken on March 31st,
2024
Some 8 relevant photos were take of the Moon in relation to a stone.
The evaluation of these photos is here.
Photos taken on April 28th,
2024
Some 9 relevant photos were take of the Moon in relation to a stone.
The evaluation of these photos is here.
Photos taken on September 12th,
2024
No accurate photos were taken of the Moon (due to battery problems
on site).
Next opportunities for photos
Depending on clouds (mooon can
be visible with naked eye when more than 1 day before/after New
Moon [NM]):
- 2025, Feb 21 (start at 7:00 BST), Feb 22 (start at 8:00 BST),
Feb 23 (top 8; start at 8:30 BST), Feb 24 (start at 10:00 BST)
- 2025, March 21 (start at 5:30 BST), March 22 (top 1; start at
6:00 BST), March 23 (start at 7:30 BST)
Workflow for observations
- At home:
- On site and one can fix the camera steady on a tripod:
- Put the camera on a tripod with its back to Stone 8 (using
possibly earlier placed golf tees).
- If not placed earlier: Place at each leg of the tripod a
golf tee (for future reference).
- Have such an exposure time (below 3sec) that the Moon is not
over exposed (perhaps even slightly underexposed) and that
stone contours are visible against the sky.
- Use a 'small' FOV (say some 10 stones are in view, something
like below picture). If you don't have such a long lens, just
do what is possible.
- Stand in front of the camera
facing the Moon. See (perhaps using binoculars) when a Moon's
lit area starts or stops touching a contour side of a stone
(so that is four touch moments for each stone), see below:
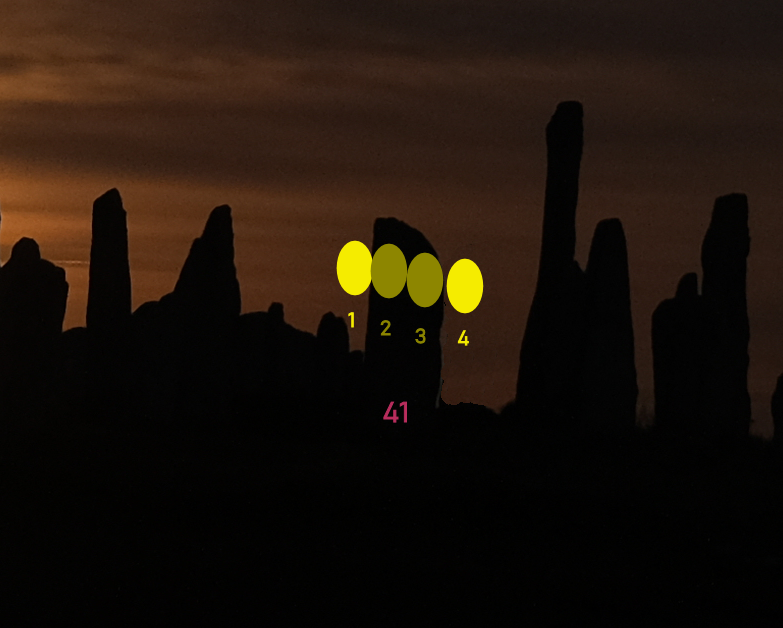
- Touch moment 1: right side of Moon's lit area just starts
touching left side of Stone 41.
- Touch moment 2: left side of Moon's lit area just stops
touching left side of Stone 41.
- Touch moment 3: right side of Moon's lit area just starts
touching right side of Stone 41.
- Touch moment 4: left side of Moon's lit area just stops
touching right side of Stone 41.
- The Moon's lit area is not always a cicle, but closer to
first or last quarter Moon; so use the first/last moment the
Moon's lit area (can be a circle-ish shope, one of the horns
or straight-ish) is seen touching the stone contour.
- At each of these touch moments, stand aside of the camera
and take photo.
- Repeat: check if Moon is still middle-ish in camera view,
stand in front camera, look (with binoculars)
and wait for touching moment, step aside, take photo for as
many touch moments and stones as possible. Minimum 5 stones or
some 10 touch moments (touch moments 1 and 4 can be the most
accurate, followed by 3).
- On site and making hand-held photos
(as one can't fix the camera on a tripod):
- Hunker down (camera in hand) with your back to Stone 8 (at
possibly earlier placed golf tees).
- Have such an exposure time (below 3sec) that the Moon is not
over exposed (perhaps even slightly underexposed) and that
stone contours are visible against the sky.
- Use a 'small' FOV (say some 10 stones are in view, something
like below picture). If you don't have such a long lens, just
do what is possible.
- See (perhaps using binoculars) when a Moon's lit area starts
or stops touching a contour side of a stone (so that is four
touch moments for each stone), see below:

- Touch moment 1: right side of Moon's lit area just starts
touching left side of Stone 41.
- Touch moment 2: left side of Moon's lit area just stops
touching left side of Stone 41.
- Touch moment 3: right side of Moon's lit area just starts
touching right side of Stone 41.
- Touch moment 4: left side of Moon's lit area just stops
touching right side of Stone 41.
- The Moon's lit area is not always a cicle, but closer to
first or last quarter Moon; so use the first/last moment the
Moon's lit area (can be a circle-ish shope, one of the horns
or straight-ish) is seen touching the stone contour.
- At each of these touch moments, directly take a hand-held
photo of the Moon.
- Repeat: hunker down at golf-tee (with binoculars)
and wait for touching moment, directly take a hand-held photo
for as many touch moments and stones as possible. Minimum 5
stones or some 10 touch moments (touch moments 1 and 4 can be
the most accurate, followed by 3).
- When back at home:
- Take a photo with the camera of an again re-synced
time on the computer (for Windows the time is on right bottom
of screen: if it does not show seconds, double left click the
time). Or in Stellarium: (re)start Stellarium
and press F5 to show the running time, do nothing else in
Stellarium).
- Send unedited pictures (including the original EXIF data) to
the group.
Experiences
The experiences are here.
Evaluating the
directions at Calanais
I
See here
for the likelyhood of possible alignments intra and inter Calanais I with solar/lunar
events.
Literature
Curtis, Ron and Margaret R. Curtis: Callanish: Stones, Moon &
sacred landscape. (1994).
Curtis, Ron: Callanish
2006. (2003).
Curtis, Margaret R.: A mini-guide to the Callanish stones. (2011)
Curtis, Margaret R. and Malcolm Maclean: Midsummer sunrise
alignment and symmetrical triple stone setting. In. Margaret R.
Curtis (ed): Celebrations in stone of the Sun's annual cycle at
Callanish. 2014. pp. 92-102.
Curtis, Margaret R. Celebrations in stone of the Sun's annual
cycle at Callanish. 2014.
Kosowsky, Michael: HeyWhatsThat. In: http://www.heywhatsthat.com/ (2012),
Accessed 2 September, 2022.
Ponting, Margaret R. and Gerald Ponting: Decoding the Callanish
complex: Some initial results. In: BAR British Series. 88 1981.
Smith, Andrew: Horizon. In: http://www.agksmith.net/horizon/ (2020),
Accessed 10 September, 2022.
Stellarium. version: 1.2 In: http://stellarium.org/en/
2022.
Thom, Alexander: Megalithic lunar observatories. Oxford University
Press 1971.
Acknowledgments
I would like to thank the following people for their help and
constructive feedback: Alistair Carty, Emma Rennie, Georg Zotti
and all other unmentioned people. Any remaining errors in
methodology or results are my responsibility of course!!! If you
want to provide constructive feedback, let me
know.
Disclaimer and Copyright
 Home
Home Up
Up Search
 Mail
Mail
Major content related changes: June 1, 2023


